Fix-It Friday – How To Fix Styling Issues
This means that if you click on that link and purchase an item I will get a commission, at no extra cost to you!
Have you ever added a plugin to your beautiful WordPress theme that was brilliant but didn’t work well with the styling of your theme? This post will learn you a bit about fixing styling issues in WordPress.
Some plugins will let you customize their styling, but often this is limited and sometimes there is no way to customize it at all.
In this post I will explain what options you have to fix this, so you can add another tool to your skillset. Don’t worry if you are not a techie, I got your back!
I use AddThis to manage the sharing of my posts on Social Media.
Let’s imagine that I want the button for Pinterest to be green instead of red and that the plugin does not give me the option to do this.
Ready? Let’s Go
Styling, for websites, is done with CSS, which stands for Cascading Style Sheets and your browser needs this so it will know how to style your content.
To help you understand how CSS works I would like to give you a short introduction. You could skip to the summary if you already know how it works, but maybe the next paragraphs will teach you a bit more about fixing styling issues in WordPress.
Let’s take a quick look at how a browser basically deals with a webpage.
The 4 Ingredients of a Webpage
Only 4? Yep, as far as a browser is concerned, a webpage only has 4 (or fewer) ingredients. This can be extended with addons and plugins, but we will stick to the basics.
Content
This is all the text, images, audio, and video that a page has, but without any structure, design, or interaction. Just plain text or bits of data that hold the message you want to send to your visitors.
HTML
To know how to structure the content, the browser needs to have some extra -markup- information.
HTML stands for HyperText Markup Language and the development of what now is used worldwide, started around 1980 by a proposal of the British scientist Sir Timothy John Berners-Lee.
In fact, this proposal is seen as the birth of the World Wide Web, not to be mistaken with the birth of the Internet, which existed in some kind of form for over 2 decades before that.
The reason I mention this is because I want to explain that HTML has been around for a long time, but it also keeps getting updates. That is one of the reasons why some things might work in one browser, but not (yet) in another one.
What HTML does is provide your browser with all kinds of data on how you intended the layout of the document.
It looks a bit like this (not actual HTML):
Document (HTML)
  Meta data (HEAD)
    Title of this page
    Where to find resource X
    Where to find resource Y
  Content (BODY)
    Title of the article (H1)
    A bit of text (P)
    An image (IMG)
    More text (P)
What is important to remember for now is that your browser ‘reads’ the document from top to bottom.
CSS
Most typically, the styling of a page is located in a so-called ‘CSS’ file and the browser is told in the meta-data section where to find it.
If you want to, you can take a look at what a browser receives from a webserver. Just open the inspector/developer panel of your browser or right-click on a page and select ‘inspect’.
To do this in Chrome you can press ALT-CMD-I (macOS) or CTRL-SHIFT-I (Windows). Select the ‘Elements’ tab to take a look at the HTML (clickable).

The above image has a line high-lighted where it tells the browser to look for a CSS file (stylesheet) at a given URL.
There is no limit to the number of CSS files you add (there is a relation with performance, but I won’t go into that for now).
Inline
It is also possible to add styling inside the document itself by using style-tags around your styling rules, for instance:
<style>
  .makemytextred {
    color: red;
  }
</style>
Another way to add styling is to add it in the HTML of a specific element itself, like this:
<p style="color: red">This text will have a red color</p>There are pros and cons to every method, but for now, it is good to know that there are multiple ‘tools’ to choose from if you have to do a job.
Hierarchy
Remember what I said about how browsers ‘read’ a document?
If you refer to more than one CSS file, or if the browser finds some inline styling later in a document, it will override the styling it already found for a specific element.
Lesson 1: The browser will use the last description of the styling it has found.
JavaScript
The fourth ingredient a browser can use are scripts that will run in the browser. Basically, scripts are used for interactions with the page or with the data.
Although there is a relation with styling, I will not go into JavaScript for this article.
Identifying the Problem
Before we can fix styling issues in WordPress, we need to know what is causing the problem.
The hypothetical problem that we need to solve is the color of the Pinterest button in the sharing tool.
The first thing we are going to do is find out why it is red at the moment.
Inspection
For this, we will need to go into the inspector/developer panel again and find the specific element that is colored red.
To do this fast, you could right-click on the element and select ‘inspect’.
In our case this shows something like this (clickable):
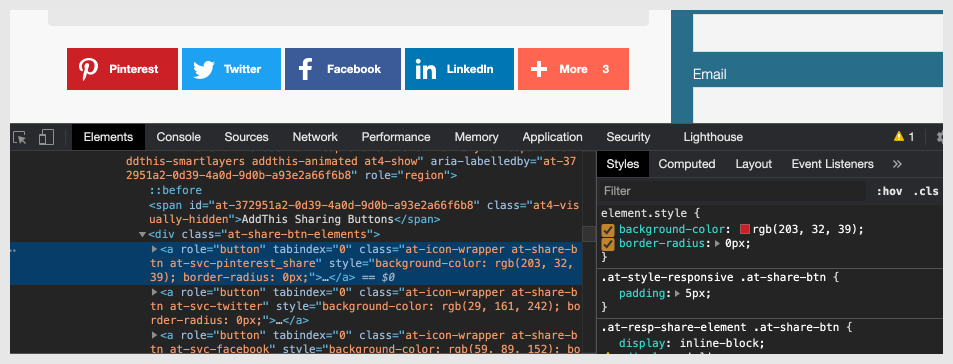
Let me explain what is happening there:
In the left panel of the image above, you see a line highlighted that shows us the HTML that belongs to the Pinterest button.
We see that it is an ‘<a>’ tag (which is typically used for links) and that it has 3 classes:
- at-icon-wrapper
- at-share-btn
- at-svc-pinterest_share
It also has some inline styling: style=”background-color: rgb(203, 32, 39); border-radius: 0px;“
We also see that the link after the Pinterest button has the same classes, except for the ‘at-svc-pinterest-share’. For Twitter, this is ‘at-svc-twitter’ and the background-color, which was also set inline, is light-blue.
In the right panel, you can see that ‘background-color: rgb(203,32,39)’ is actually a red color. We might be on to something, but before we proceed I want to explain a bit more about what you might encounter in CSS, as it is likely that you encounter different problems.
CSS Selectors
The ‘<a>’ is called a tag, or native HTML. It refers to elements every browser should understand if it follows the W3C guidelines.
In this paragraph, I am going to show you some other examples of what you might find in CSS files. Don’t worry if you find them hard to understand.
In CSS files you will also find IDs and Classes, which are identified by a ‘#’ or ‘.’ that precedes their name. Here are some examples:
#thishasanid
#ThisHasAnID
#this-has_and-id
.iamaclass
.i-am-a-class
.I_Am_A-class
Tags, classes, ids, and combinations are called ‘selectors’ and as you can see, the naming is pretty loose and it is perfectly ok to mix upper- and lowercase in class names and ids as far as the browser is concerned.
If you work with others, or if you want to go further than just fixing things, then you should read more about conventions and best practices.
A great place to learn more about CSS is W3Schools, but if you would like to find something less auto-didact then you could do a CSS course on Fiverr for instance.
Paths
Not every selector has just one tag, class, or id. There are combinations as well, which, I think, are best explained by examples:
Remember the ‘<a>’? It is a standard HTML tag representing an anchor ( hyperlink), but it can have a more specific annotation. Here are two examples:
<a id="MyUniqueHeader">
<a class="a_special_type_of_header">
For these the CSS may look like:
a { ... } (all anchors)

#MyUniqueHeader { ... } (all elements that have the MyUniqueHeader ID)

.a_special_type_of_header { ... } (all elements that have the a_special_type_of_header class)
But you may also find combinations:
a.a_special_type_of_header { ... } (all anchors that have the class 'a_special_type_of_header')And finally, you can find paths or nested elements.
If our anchor was nested in a ‘div’ (an HTML tag that indicates a block) with a class ‘special_block’, then the HTML could look like this:
<div class='special_block'>
  <a id="awesome_header">
The CSS that would target our element could look like this:
#awesome_header { ... } (least specific)

div.special_block a#awesome_header { ... } (most specific)
You can see in the most specific example that all elements are used. The whitespace before the anchor-tag indicates that it is nested within the element that precedes it.
Here is another ‘hierarchy’ rule:
Lesson 2: Browsers will favor the most specific path.
Properties
Finally, a CSS rule has specific instructions, also known as properties, that you will find between the curly brackets.
There are a lot of properties but don’t worry, they are well documented, both in a technical description as in a more user-friendly way.
Properties have a name and a value. For instance, if I want to color the background of an anchor blue, it would look like this:
a {
  background-color: blue;
}
Every property ends with a semi-colon.
There are properties for borders, colors, backgrounds, font-size, etcetera.
I really recommend the previously mentioned W3Schools website if you want to figure out what a property does.
Back to Fixing Our Problem
What do we know about our (hypothetical) problem?
- The Pinterest button has its background color set inline (inside the HTML), which makes it difficult to change there. To do so, we would have to alter the HTML or use JavaScript.
- The Pinterest button has a distinct class (at-svc-pinterest_share) which we might use to target this specific button.
- HTML and styling rules are read from top to bottom, so if we want to change the color, we need to do this after the original styling has loaded into the browser.
- The background-color was set inside the anchor tag itself. This makes it impossible to be more specific, as it automatically is as specific as can be. This is also loaded last before rendering the component, so changing it by loading new styling later than that is not possible (without a trick).
Lesson 3: Inline styling gets a higher priority than styling taken from CSS files or styling blocks.
How to Add CSS in WordPress?
You have a couple of options here.
One of them is hacking into the PHP, and add your stylesheets in the header or enqueue them in the functions.php.
Did I lose you? Please come back, we are not going to do this.
So how do you fix styling issues in WordPress?
One way is to use plugins like Simple Custom CSS. This plugin will allow you to add your custom CSS file to your WordPress site.
It also has an editor that will warn you if you make a typo.
The third and last (for this article) method is to use the build-in CSS feature that WordPress has added to the Appearance menu. You will find it here: Appearance > Customize > Additional CSS

Let’s make some changes
If all went well, you should see an editor on the left where you can type your additional CSS. Changes should be visible immediately in admin mode, but don’t forget to click publish after you are done.
In our example, we saw that we could target the Pinterest button with a class that only the Pinterest button has: ‘at-svc-pinterest_share’.
So let us see what changing the background for that class will do (clickable):
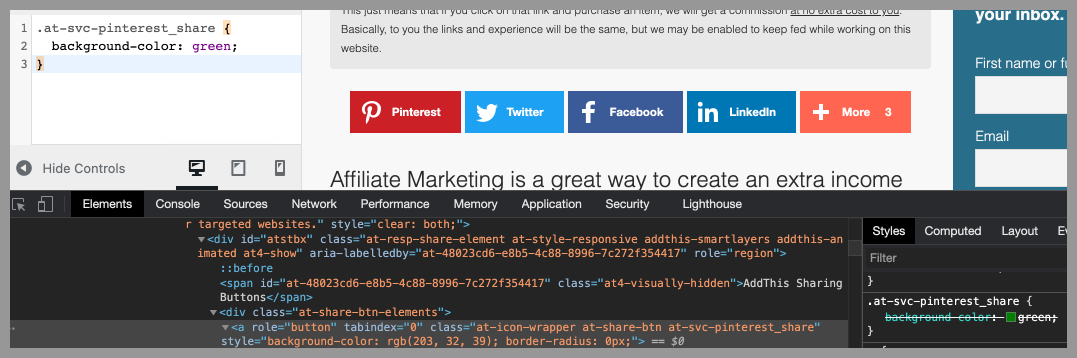
It did not change the background color. We can see in the inspector panel that our changes were loaded, but the strike-through indicates that it was overwritten by styling with a higher priority.
This does not come as a surprise as we just learned that inline styling gets a higher priority than CSS that was retrieved from a CSS file or styling block.
Our Final Option (for CSS only Solutions)
CSS properties can have a powerful rule added that will promote it to the highest priority: the !important addition.
This rule is a bit controversial and it has a bad rep because it is often used in badly formatted CSS, often made by lazy developers.
It is, however, exactly what we need here, as there are no other CSS-only options left.
You use it by typing it after the property-value, but before the semi-colon. Like this (clickable):
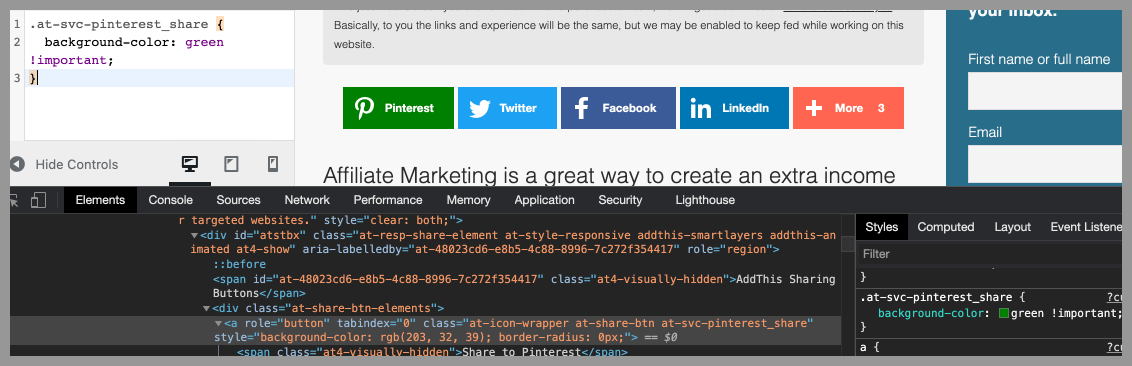
As you can see, the button color has changed to green because the !important rule worked like a charm. We fixed our styling issue in WordPress!
Lesson 4: !important will raise the priority of a property.
Don’t forget to hit the publish button (I won’t because I like the red version).
Should You Use the Build In or the Plugin Option?
Well, that is up to you.
It is good to know that the build-in option is connected to your theme. So you will lose these changes if you switch themes.
On the other hand, you should only use the option to override CSS for incidental situations. If you utilize this option a lot, then maybe it is time to pick another theme or create your own.
Summary
What are the important things to remember? I made a small list:
- The browser will use the last description of the styling it has found. It reads the HTML line-by-line, top-to-bottom. The same goes for your CSS.
- Browsers will favor the most specific path.
The more specific you are in targeting an element, by name or by its classpath, the more likely it is that your styling will be preferred over more generic styling. - Inline styling gets a higher priority than styling taken from CSS files or styling blocks.
- !important will raise the priority of a property.
- You can override CSS using the build-in customizer or add a plugin that will let you do this.
Finally
I hope that this article gave you a bit of insight into how CSS works, how browsers use it, and how you can tweak or fix styling issues in WordPress.
Fix-It Fridays
I started the Fix-It Friday series a while ago in an attempt to prevent that I only worked on the technical parts of a blog instead of writing content.
Some topics I encounter are worth sharing and I believe that I can translate the tech-talk to an understandable level.
Friday is my tech-day and I write about it on the fly.
What’s Next
Well, if you liked this post, then I would really appreciate it if you shared it on your social media.
Thank you for visiting! You are awesome!