Fix-It Friday – Playing With Lists in WordPress
This means that if you click on that link and purchase an item I will get a commission, at no extra cost to you!
Let’s start with what I want to accomplish while playing with lists in WordPress. It might give you a bit of an idea of what this post is going to be about.
The Side Gig Longlist is based around lists. In WordPress, this is quite easy to do, especially with an awesome plugin that I will talk about later.
What I would like to do is to add some properties to the list-items (the posts) in order to provide more data to my visitors. Let me try to show you what I mean with an example. This is the title of a list item in the ‘survey’ list, as you can find it on the page about paid surveys:

If you click the title, you will go to my post about Survey Junkie.
What I would like, is to add properties to that page that will give you, as the reader, some information beforehand.
For instance, if the gig is only available in the US, or if I tried it myself.
Take a look at this example. It is not how it is going to look in the end, but I hope you get what I would like to do:

Still interested? Let’s get to it then!
Fix-It Friday
In my previous Fix-It Friday post, How to Get More Out of a 404, I took quite some time explaining what it was that made me start this series of posts.
It would get kinda boring if I did that every time, so here is the short version.
I am a developer that wants to learn more about (the non-technical aspects of ) blogging. In order to keep my ‘Inner Nerd’ happy, I chose Friday to do all the techy things.
Since this could become a nice topic to blog about, and I need to keep my ‘Inner Writer‘ equally happy, I started the Fix-It Friday series.
How to Create Lists with the W4 Post List Plugin
W4 Post List (W4PL) is a free WordPress plugin that lets you create reusable lists from your posts or pages based on your categories, tags, or even post IDs.
Every list is represented as a shortcode (see it as a tag or placeholder) that you can insert in your posts.
WordPress will translate that shortcode to the actual list.
Although this might sound a bit technical, W4PL is one of the easiest plugins to work with, so bear with me.
Creating a New List
After installing and activating the plugin, you will find it in WordPress’s left menu bar. The plugin follows the familiar patterns, so when you click it, it will take you to a page where you are presented with the lists that you have created earlier. And the option to add a new list.
Click ‘Add New’ and name your list (‘An Example List’).
On the left, there are a couple of tabs. Within the topic of this post, it would go too far to explain all of the features and options, but follow along and check the documentation if you would like to learn more.
After entering a name for the list, select the ‘Posts’ tab.
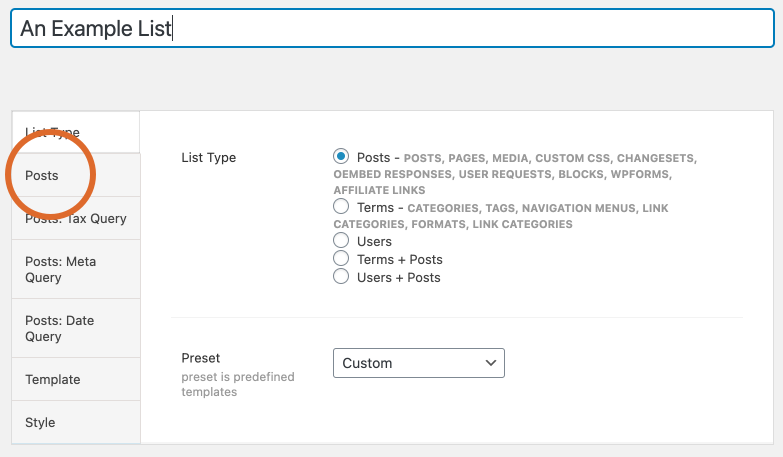
Here you will find a lot of options to select and filter the posts that are going to populate this list.
Leave everything to the default and scroll down to the ‘Include posts’ input field.
I am going to add 3 post IDs for this example.
If you don’t know how to find the ID of a post: Open a post (in WordPress) and take a look at the URL. You will find it there.
![]()
Use a comma to separate the IDs as you enter them:

Now save your draft and hit the Preview button. You should see a list with the posts you have selected. If not, then check the IDs again and make sure you used a comma to separate the IDs.
Customizing How the List is Shown
If all went well and you left everything to its defaults, then the list would probably contain list items with the title of your post, a 20-word excerpt and a ‘continue reading’ link.
You can customize the way this looks in the ‘Template’ section. The list template is a mix of HTML and shortcodes.
Default, this is how it looks:
<ul>[posts]
<li>
[title]
[excerpt wordlimit=20]
[more]
</li>[/posts]
</ul>
In ‘human’ language it reads:
Create a list (<ul>) from all the selected posts ([posts]) where each item (<li>) shows the title ([title]), the first 20 words ([excerpt wordlimit=20]) and a link to the post so the visitor can read more ([more]).
The two ingredients of this template are HTML and the Shortcodes (template tags to special functions) that are included in W4PL.
You can find an overview of all available W4PL shortcodes in the documentation and under the ‘Shortcodes’ button on the template tag.
A good (free) HTML reference is available on w3schools or you could follow a course. There are a lot of HTML courses available, for instance on Fiverr, Udemy, or SkillShare.
Now for the customizing part
Let’s change the template so that it shows a list with only clickable titles.
I also want it to have numbers in front of the link.
To do this I change the Unordered List (<ul>) to an Ordered List (<ol> and I remove the excerpt and the read-more shortcodes, like this:
<ol>[posts]
<li>
[title]
</li>[/posts]
</ol>
Hit the publish button to make this list available for insertion into posts.
You will see the shortcode for this list in the ‘Published’ notification at the top of the page:

Copy the complete code (including the [ and ]) and insert it into your post.
Here is mine:
Now that we have a basic understanding of how to use the W4PL plugin we can move on to another ‘ingredient’ of our goal: Custom Fields
Custom Fields
Custom Fields are a way to add extra data to your posts. A lot of plugins already use this feature, probably without you noticing, to keep track of settings you have made.
Where to Find It
If you open a post in edit mode, the Custom Fields panel is probably situated at the bottom of your page.
You may have to enable it in the editor.
To do this: Select the dots in the right upper corner of the page, like this.
 Now scroll down until you see ‘Options’. Click it and in the pop-up, select ‘Custom fields’:

Close the popup and scroll down. You should find something similar to this:

In this example, you can see a custom field that I have created myself. Its name is ‘img_attr_text’ and the value is a text with the name of a photographer.
I use this field to show the image attribution text beneath the featured image.
Adding a New Custom Field
In that same Custom Fields panel, you should find a link ‘Enter new’.
Click it and enter a name and value for it. Hit Add Custom Field when you are done.
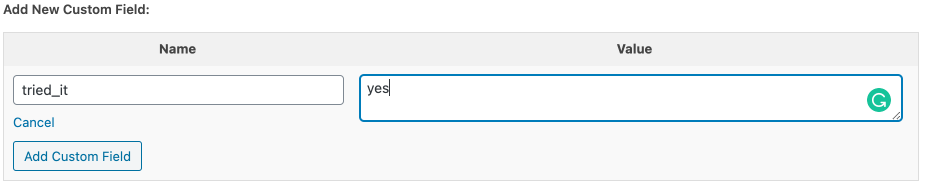
This post now contains a custom field ‘tried_it’ and its value is set to ‘yes’.
With the dropdown box, you can select other existing custom fields to add.
The Custom Field that you just added will be available for every post.
I See It, but Nothing Happens
Try to see the custom fields as properties of your post.
In the example with the image attribute text I mentioned above, I made a little piece of code that reads this specific property and converts it to HTML.
Custom Fields by themselves do nothing. They need a piece of code or a plugin to read them and do something with the information it contains.
Back to the W4 Post List plugin
So the goal is to read the properties we created and use them in the lists we make.
As this is pretty specific functionality for our own website, it is not much of a surprise that there is no shortcode for this available in W4PL.
You probably guessed it, we will have to add it ourselves.
Yes, this will involve adding some code but don’t worry, I will talk you through it!
Adding Shortcodes to W4PL
It is quite easy to add your own shortcodes, besides the coding part, by adding it to a file called functions.php.
Almost all themes contain this file, as it is essential to how your theme works. This also means that if you mess things up in this file, your website may return an error.
You don’t want an hour playing with lists in WordPress to end up in a day of stress, do you?
Backup (Please Do)
There are a lot of ways to backup your website. Just search for ‘backup’ in the Plugins section of WordPress and select the one that you find the most user friendly.
I like to frequently back up all my files with a file manager like FileZilla and I make weekly backups of the database.
Every website is different and has different hosting specifications. Some hosting providers include backups into their plans. I use Hostinger, which has default (free) and extended (paid) backup options.
Some backup methods may become too advanced for non-tech users or too simple for advanced users.
My advice is that you take your time to find out what works for you.
If you do not make backups, stop reading this and find out how to create a backup now.
Where to Find the Functions File
The functions.php file is located in your theme. You will find your theme in the ‘wp-content’ folder under ‘themes’.
Open the folder with the name of your theme. The functions.php file should be at the root of your theme.
Adding the Function
Now open the functions.php file (did you make a backup?).
You will see a lot of code here. We are going to add something at the end of the file (last time: did you make a backup?)
I know that it is best practice to organize your code in a better way than ‘adding to the end of the file’, but that is another post.
I tried to explain as best as possible what each line of code does in the comment lines. These lines start with a double slash and you can remove them without affecting how it works.
Don’t let the amount of text scare you. If you delete all the comments it’s less than 10 lines of code…
function tried_it_action( $attrs, $content ) { // we will need to return something, either 'empty' or some HTML. // create a variable to store this in and set it to empty $return_tried = ''; // lets find out if there is something in the tried_it custom field of our post // we will need the built-in function 'get_post_meta' to access the custom fields // this functions takes 3 parameters: // the ID of the post, which we will get with the built-in 'get_the_ID()' function // the name of the Custom Fiels: 'tried_it' // the last parameter tells the get_post_meta function to expect a single value or an array (a collection of values) Set it to true. // to find out if the value that is returned by the 'get_post_meta' is set to 'yes', we use an 'if' to compare it and find out if they are equal with '==' if ( get_post_meta( get_the_ID(), 'tried_it', true ) == 'yes') {
// if the values where not equal, the 'if' would have been false and it would not enter this piece of code. // the variable '$return_tried' would keep the value we gave it in the beginning ('') // if they where equal, the code inside the 'if' will be executed. This gives us the opportunity to put new information into the '$return_tried' variable. // I added some HTML that tells us if it worked. $return_tried = '<b> (Tried It!)</b>'; } // we are done. Now let's return what we have stored in the return variable return $return_tried; } // Now we need to add this function to the shortcodes of W4PL function w4pl_tried_it( $s ) {
// Let's call the shortcode: 'tried-it' // we tell W4PL that it is applicable to pages of the type 'Post' // we tell W4PL that it should use the function that we have created, if it encounters a 'tried-it' shortcode. // I left the description blank, sorry, lazyness... $s['tried-it'] = array( 'group' => 'Post', 'callback' => 'tried_it_action', 'desc' => '' ); return $s; }// Now we need to tell W4PL that we have created a custom function // just copy the code add_filter( 'w4pl/get_shortcodes', 'w4pl_tried_it', 30
Now save the functions.php and/or upload it to your server.
Adding the Shortcode to our List Template
When we return to the W4PL lists and open our list in edit mode, we should be able to find our shortcode.
Place the cursor in the template at the spot you would like to add the shortcode. Now click on the ‘Shortcodes’ button.

Click it. You should see a shortcode appear in your template.
Now let’s save/publish it and see what it looks like.
The first time I made the mistake of not adding the Custom Fields to the posts in this list. As I thought I made a mistake in the code, I was trying to debug it for half an hour.
So: add the custom fields to the posts before you test the list.
- Canva (Tried It!)
- Tailwind (Tried It!)
- Upgrade Your Content with Grammarly (Tried It!)
Whoohoo!
Wrapping it Up
I am going to wrap this post up, as I now have a way to add some custom properties to the posts.
The next thing for me to do is to change the HTML that is inserted to something that has a better UX (for instance with icons instead of the text ‘Tried It!’
It will not be included in this post as it is already becoming quite long.
Just drop a request in the comments if you would like to know how I added the icons.
Conclusion
What have I learned playing with lists in WordPress? Did I like what the W4 Post List plugin offers? Well Yes!
I think that it is a very customizable plugin with which you can change the contents and the looks of your lists quite easily.
It does take a bit of coding but I think that you should be able to do some great things with a basic understanding of it.
Update
I have just finished adding 3 ‘extensions’ to my lists: ‘tried it’, ‘liked it’, ‘made money’.
What I need to do now is add the custom fields to all the posts I want to ‘tag’ like this. Here is a screenshot of one of the items on the Sell your Pics list:
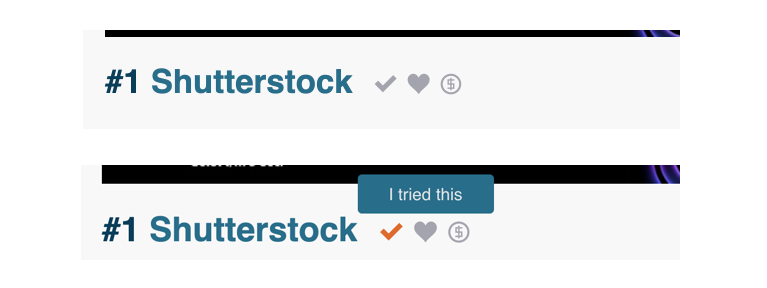
As you can see, the icons don’t distract too much (or I think so), but when you hover over them, they show you a tooltip about their purpose.
What’s Next
Well, if you liked this post, then I would really appreciate it if you shared it on your social media.
Thank you for visiting! You are awesome!

Leave a Reply