Make Your Pins Pop
This means that if you click on that link and purchase an item I will get a commission, at no extra cost to you!
By now, many of you already know some of the basics of getting your pins noticed on Pinterest. It would help if you made your pins pop so they get noticed in that overwhelming stream of pins.
They need to have bright, beautiful colors, big fonts, not too much text, and many pinners claim: they also need fresh and original images.
I agree, but I believe that pins without images can be beautiful and noticeable.
Made with Canva
I use Canva to create my visuals for Pinterest, and while I was playing with some new concepts, I got a result that I believe is really nice and decided to write this ‘Make Your Pins Pop’ post.
I want to explain how I did it (it’s straightforward). But before we start, I will show you the result in case if you missed the pin.
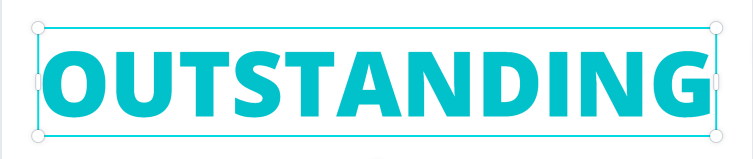
Outstanding
This tutorial is about how I did the ‘shadows’ of the word ‘outstanding.’
Canva has many very user-friendly tools, even in the free version, but still, they are limited. Tools like Photoshop have far more features, but it is pretty complex and difficult to learn.
Canva is perfect for quickly designing pins, Instagram visuals, printables, business cards and-so-forth.
If you haven’t started using it, then do yourself a favor and register for an account. It has a free version, but you probably want to go premium fast. You can try the Pro version for free over a period of 30 days.
Now, here is the pin I used it on:
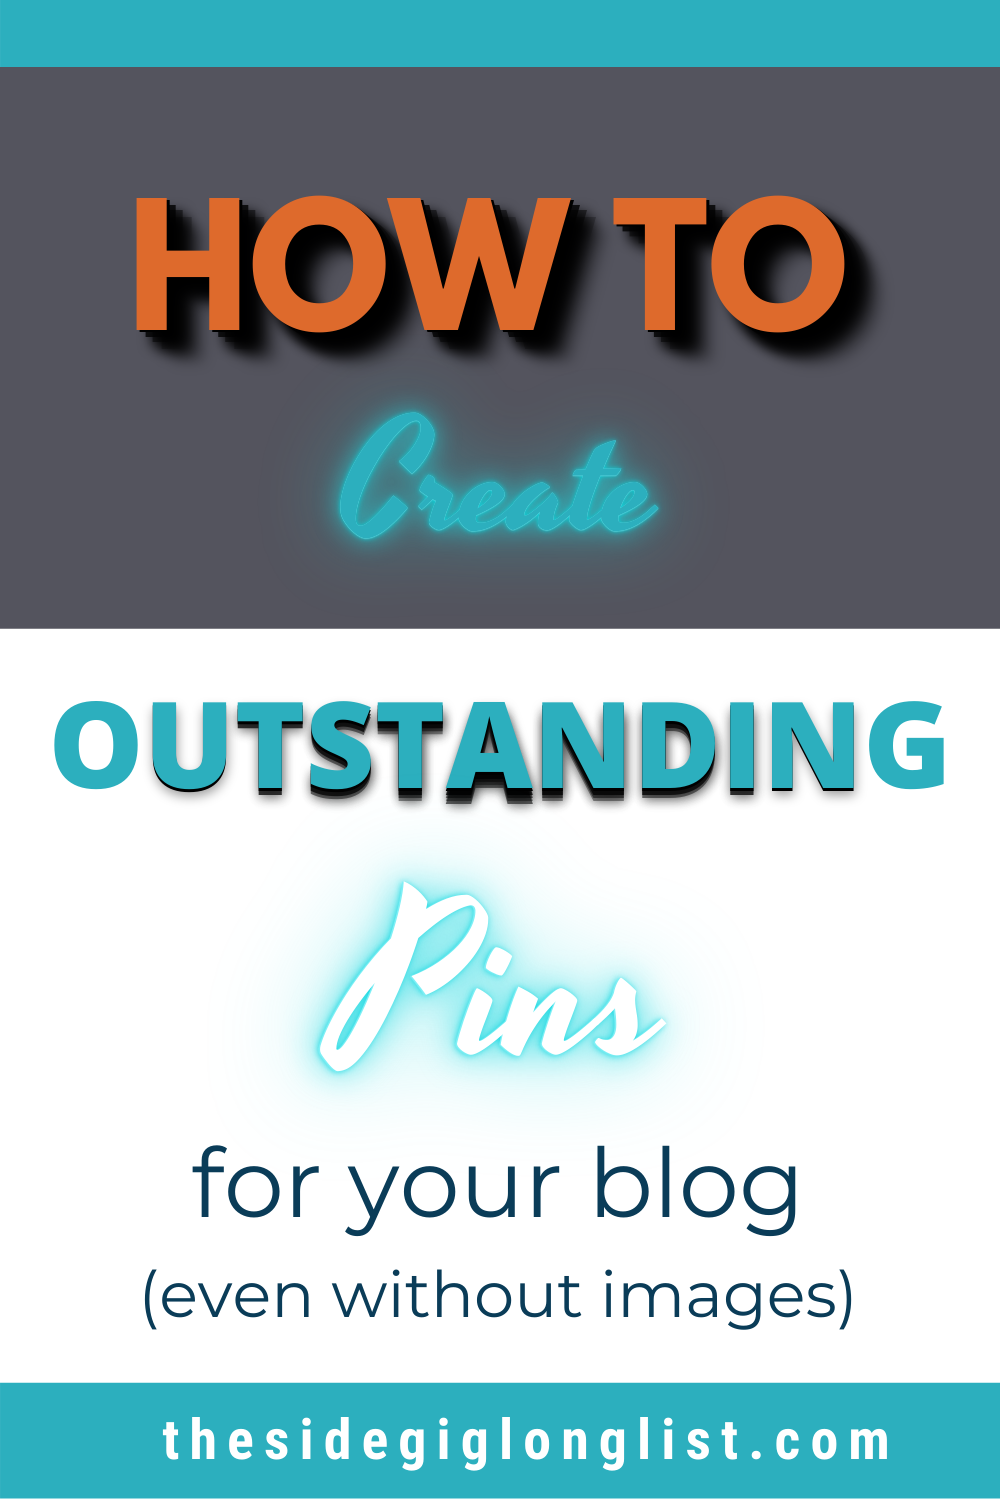
You see that I’m playing around with different ways to make simple words attractive, without using images.
A Little More Work
As I said, Canva has many tools, and the neon glow I used above is a default one.
I used the same word twice and placed them on top of each other to emphasize the effect of a glow behind it.
The long shadows are a little more labor-intensive.
If you have a blog or want to start one, you can imagine that you have less time available. The following steps will take more time, but because of the user-friendliness and easy learning curve of Canva, you will find that you will speed up automatically after two or three times.
Step1:
Create a new design (preferably a pin template) and select a suitable font from the list.
I recommend not using the fancy ones, but keep them bold and beautiful.
Align the text to the sides and center it. Make sure you have enough space left on the sides.
Step 2:
We are going to create a textbox for every character of the word.
I chose to keep the outer characters ‘flat’.
Place them above the matching characters in the complete word. Canva ‘snaps’ them in place when you get close to the right position.
I have placed them a little lower in my example for illustration purposes. You need to align them perfectly.
Give them a dark color and a subtle shadow.
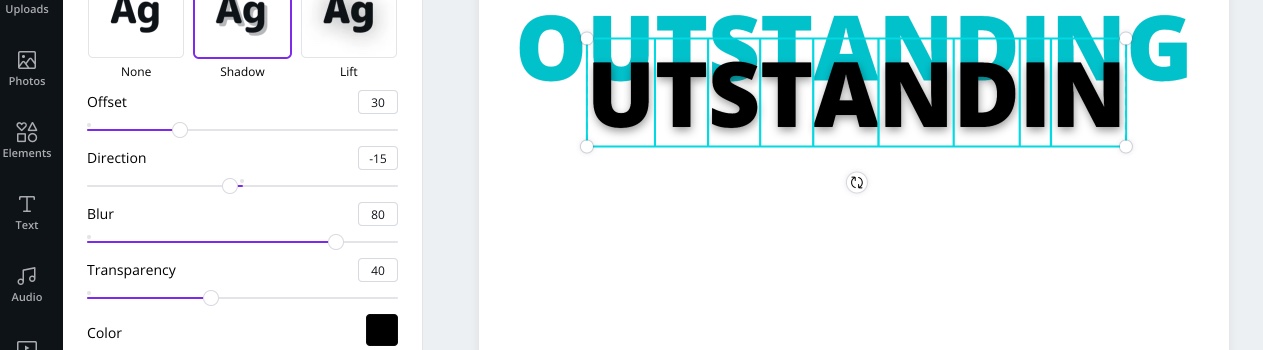
With all the separate characters selected, right-click and select ‘Group‘.
Step 3:
Right-click again en select ‘send to back.’ Make sure that you do not lose the selection (by clicking on something else).

Step 4:
Now with the cursor keys on your keyboard, shift the selection down and maybe to the right a bit. Three times down was enough for me, but I recommend you judge by sight since this may look different from other fonts.
you can play with the effect by shifting left or right also.
Step 5:
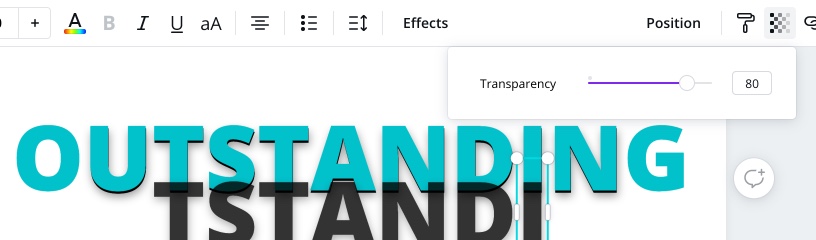
I hope you still have your selection because we need a copy of it. Use your keyboard again (CTRL-C, CTRL-V) to copy and paste.
The copy will show up on the top layer, but it will not be aligned. Align it again with the full word.
Right-click and ungroup the selection.
Select only the outer characters and delete them.
I set the transparency of these characters to 80%. You will find it in the right-upper corner (click the checkerboard).
Make a group of the remaining characters (select them all, right-click and select group) and send it to the back.
Using your cursor keys, shift them into position again.
That’s basically it.
Repeat the process until you have no more characters left.
You can play around with adding more copies when you need to make a transition (if the offset between two layers is too big, you will start to notice a more jagged edge)
You can also play with the settings of the shadow.
The words ‘HOW TO’ were done using the same principle, creating the illusion of a long shadow.
This brings me to an important tip: You don’t have to make it perfect!
The suggestion of a shadow is enough. It doesn’t have to be completely realistic.
People will view your pin for just a couple of seconds. Your design has to grab the attention, the content (your text) will take over.
Conclusion
I had a lot of fun playing with the possibilities this method gives me on top of the features Canva already has. Hopefully, you have learned a thing or two from this mini-tutorial.
Please show me your pins. I’m curious about what you are going to create! Make your Pins pop!
O, and while you are at it, maybe share mine?
Thank you for reading! You are awesome!
